QuickBooks hosting means deploying the QuickBooks desktop version on the network server via the internet to access QuickBooks account from anywhere and anytime. In simple words, data and files are accessible from anywhere and anytime with the hosted version of QuickBooks. QuickBooks hosting gives the user benefits of both the environment, sturdy desktop version, and anywhere accessible QuickBooks online version.
How Does QuickBooks Work?
The working of QuickBooks desktop version on cloud platform works as follows:
- A licensed copy of the QuickBooks version gets installed on the network server of the cloud service provider.
- The authorized QuickBooks user will have accessibility to the server via the internet and a set of configurations:
- A licensed copy of the QuickBooks version gets installed on the network server of the cloud service provider.
- The authorized QuickBooks user will have accessibility to the server via the internet and a set of configurations.
- A licensed copy of the QuickBooks version gets installed on the network server of the cloud service provider.
- The authorized QuickBooks user will have accessibility to the server via the internet and a set of configurations.
Related: What Is a Cloud-Based CRM and Its Benefits?
The Basic Requirement for Setting Up QuickBooks on Cloud Platform
To use QuickBooks multi-user accessibility mode after setting up your QuickBooks Desktop on the cloud server, you can now add up to 30 users to access your company files. It indicates that now your accountant can easily access the company accounts from anywhere. Here are the preconditions for setting up your QuickBooks Desktop for cloud hosting-
- A subscription to the QuickBooks cloud hosting service will give you an Online cloud space storage for instaling and running your QuickBooks desktop account on virtual servers.
- A speedy internet connection.
See Also: FreeNAS Alternatives | Best Storage Operating System
3 Easy Steps to Host QuickBooks in the Cloud in 2021:
1. Download QuickBooks and Start the Installation

- Go to the QuickBooks Product Download page and select the country, product, and QuickBooks version from the drop-down menu.
- Click on Search and click the download button.
- Open the downloads, and do a double-click on the QuickBooks installer.
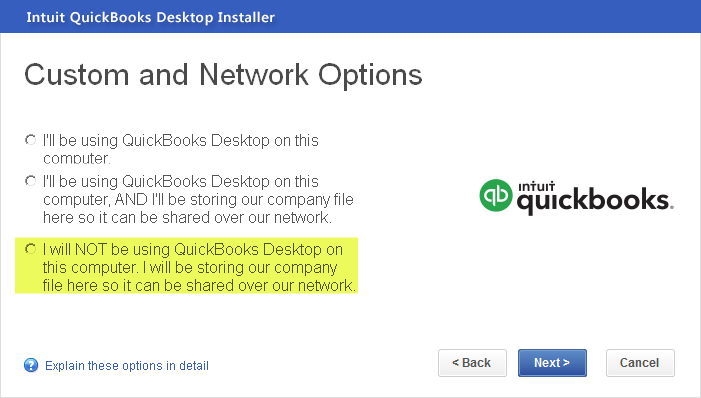
- In the Choose your Installation Type Window, click on Custom and Network options and click on Next.
- Now, in the Custom and Network options select, ‘I will not be using QuickBooks on this computer. I will be storing our company file here so it can be shared over our network‘, and click on Next.
- Once it gets installed, click on Open QuickBooks.
2. Setup QuickBooks Company File in the Cloud (Network Drive)
- After finishing the installation, you can go to the C drive of your computer.
- Make a new folder and name as QuickBooks.
- Place your company file in that folder.
- Right-click on the folder, and from the Share with options, select specific users with whom you want to share your company files.
- You can choose everyone and click on Add, to share the company files with everyone.
- If you need to grant access to specific people of the QuickBooks company file, enter the User Name and click on Add.
- You can give the read/write permission to the users under the Permission Level from the drop-down menu.
- Click on Share and enter the administrator credentials to log in.
- Now, do a right-click on the QuickBooks folder, which you made in the C drive, and select the Properties.
- In the Sharing tab, search the network path.
- Write down the network path to access the company file information.
- Open the File Manager on your computer and click on Map Network Drive on the top.
- Enter the noted path in the shared folder in the Folder text box and click on Finish.
- Enter the login credentials for accessing the company files and click on Ok.
3. Install QuickBooks Desktop on the Client Machine

- Download the QuickBooks installer on the desktop and run the QuickBooks setup file.
- In the Custom and Network options, choose I’ll be using QuickBooks on this computer and click on Next.
- Once the installation gets accomplished, click on Open QuickBooks.
- Follow the instructions for the completion of the Product registration process.
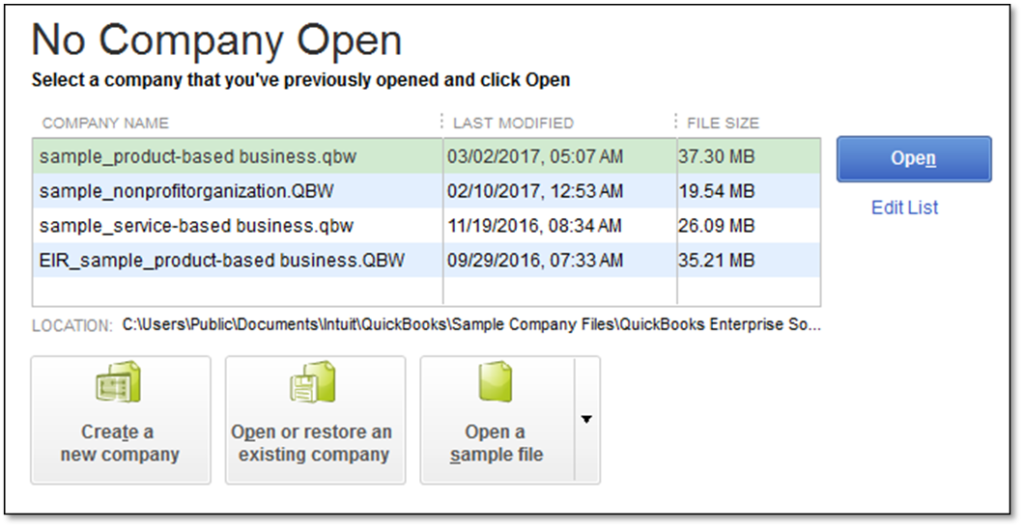
- Now in the No Company Open window, select Open or Restore an Existing Company File.
- Open the network drive and select the company file.
- Click on Open and click on Yes, if you want to give a permit to other users for accessing the company file on the network.
See Also:
Conclusion
Hopefully, with the help of the detailed instructions mentioned above, you were able to set up QuickBooks successfully on the cloud. If you need any assistance while hosting QuickBooks on the cloud platform, you can contact our Sagenext Infotech support desk for further clarification or queries. You can even send us your questions via email.
Rupinder works at thesagenext.com.


