
✍ Last Updated on January 1, 2025 by Nick Cullen (Senior Content Editor)
In today’s fast-paced digital landscape, the ability to capture information quickly and efficiently is not just a skill; it’s a necessity. Whether you’re a seasoned IT professional, a student juggling multiple online classes, or a freelancer navigating the complexities of remote work, knowing how to take a screenshot is an indispensable tool in your digital toolkit.
But let’s face it, not all screenshot methods are created equal. Depending on whether you’re operating on Windows 10, Windows 11, a Chromebook, or a brand-specific machine like HP or Dell, the techniques can vary.
That’s where this comprehensive guide comes in. We’ll delve into the nitty-gritty of screenshotting on various platforms and devices, offering expert tips that will turn you into a screenshot guru in no time. From the classic Print Screen method to the modern Snip & Sketch features, we’ve got you covered. So, buckle up and prepare to master the art of capturing your screen like a pro.
8 Ways for Screenshotting on Windows in 2025
Tip 1: The Classic Print Screen — Your First Step into Screenshotting Windows
The Print Screen key, often abbreviated as “PrtScn,” is the most straightforward way to take a screenshot on Windows. Simply press the key, and your entire screen’s contents are copied to your clipboard. From there, you can paste it into any application that supports image pasting, like Microsoft Paint or Word.
However, this method captures everything visible on your monitor(s), which might be overkill for some situations. If you’re looking for more specific screenshotting options, read on.
Tip 2: Snipping Tool — The Underestimated Powerhouse
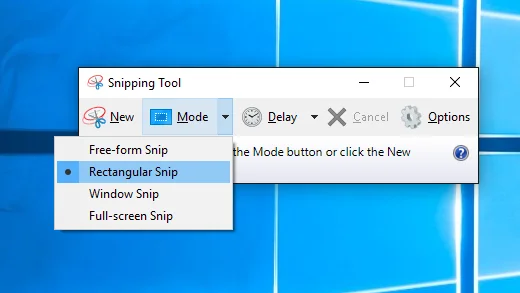
Before you jump to third-party applications, don’t underestimate the built-in Snipping Tool on Windows.
The Snipping Tool was first introduced in Windows Vista, which was released in 2006. Since then, it has been included in subsequent versions of the Windows operating system, such as Windows 7, Windows 8, and Windows 10.
This handy utility allows you to snip on Windows by selecting a portion of your screen to capture. You can even annotate the screenshot before saving it.
The Snipping Tool has been a staple for Windows users for years, but it’s often overlooked. It’s perfect for quick, simple screenshots without the need for any additional software.
See Also: Best CCleaner Alternatives
Tip 3: Snip & Sketch — The Modern Way to Snip on Windows
If you’re using Windows 11, you have access to Snip & Sketch, an updated version of the Snipping Tool. To access it, press Win + Shift + S. A small toolbar will appear at the top of your screen, offering various screenshot options.
Snip & Sketch is particularly useful for those who frequently annotate their screenshots. It offers a range of markup tools, making it easier than ever to highlight important information or add comments directly to your screenshot.
Tip 4: Take a Screenshot on Windows 11 — The New Kid on the Block
Windows 11 brings a fresh look and feel, but it also introduces new ways to take screenshots. The Snip & Sketch tool is still available, but now you can also use Win + Shift + X to bring up a new screenshot menu.
This new feature in Windows 11 makes it easier to choose the type of screenshot you want to take, streamlining the process and making it more intuitive than ever.
Tip 5: Screenshot on Chromebook — When Windows Isn’t Your Only Device
If you’re a multi-device user and have a Chromebook in your arsenal, screenshotting is just as straightforward. To capture the entire screen, press Ctrl + Show Windows (Ctrl + F5). For a partial screenshot, use Ctrl + Shift + Show Windows (Ctrl + Shift + F5).
While Chromebooks aren’t Windows devices, knowing how to screenshot across multiple platforms makes you more versatile in the digital world.
Must Read: Gboard Keeps Stopping: 8 Ways to Fix the Issue
Tip 6: Screenshot on HP — The Brand-Specific Nuances
If you’re using an HP laptop, you might find that the Print Screen key is combined with another function. In this case, you’ll need to use Fn + Print Screen to capture your screen.
These brand-specific nuances can be confusing, but once you know the right combination, screenshotting on HP becomes second nature.
Tip 7: Screenshot on Dell — Another Brand, Another Method
Capturing the Entire Screen on Dell
To capture the entire screen in one fell swoop, simply press “Windows logo key + PrntScrn key” together. This will not only take a screenshot but also save it automatically in the “Screenshots” folder within the “Pictures” folder. No need to paste it into another program; it’s already saved for you.
Capturing All Active Windows on a Dell Laptop
If you’re a multitasking maven with multiple active windows, capturing them all is as easy as pressing the “PrntScrn key“. This will copy all active windows to your clipboard, allowing you to paste the screenshot into an application of your choice, such as Microsoft Paint or Word.
Capturing a Single Active Window on a Dell PC
Sometimes, less is more. If you need to capture just one active window, the process is equally simple. First, tap or click the window you want to capture to make sure it’s active. Then, press “Alt + PrntScrn keys” together. This will capture only the active window, allowing you to focus on what truly matters.
Also Read: Seeing Multiple Chrome Processes, Why? 8 Methods to Stop Them
Tip 8: Third-Party Tools (Extensions)
Sometimes the built-in options are not enough, especially for advanced users who require additional features like timed screenshots or video capture. In such cases, third-party applications like Awesome Screenshot, Snagit, or Lightshot can be invaluable.
These tools offer a wide range of options, from capturing scrolling windows to recording short videos, providing you with a comprehensive screenshotting solution.
How to Take Screenshots without Print Screen Button
So, your keyboard is missing a Print Screen button, or maybe it’s not functioning. No worries! You can still capture that meme, snag that recipe, or document that super-important email. Here’s how:
The Snipping Tool and Snip & Sketch
You can find these handy tools in the Start Menu. Just type “Snipping Tool” or “Snip & Sketch” in the search bar, open the app, and hit the “New” button to take your screenshot. If you’re a shortcut junkie, Win + Shift + S will bring up Snip & Sketch instantly. Choose the area you want to capture, and you’re good to go.
The Shortcut for the Shortcut Lovers
If you’re on Windows 10 or Windows 11, you’ve got another quick trick up your sleeve. Press Win + Shift + S, and a small toolbar will pop up at the top of your screen. Pick the type of screenshot you want to take, and voila! Instant screenshot without the Print Screen button.
The On-Screen Keyboard
Did you know Windows has an On-Screen Keyboard? Yep! Head to Settings, then Ease of Access, and finally, Keyboard. Turn on the On-Screen Keyboard, and you’ll see a clickable PrtScn button right there. Just click it to take your screenshot.
Also Read: Steam Download Stopping? 9 Ways to Fix It
Where Do I Find My Screenshots on Windows?
The location where screenshots are saved on a Windows computer can vary depending on how you took the screenshot. Here are some common methods and their respective locations:
Snipping Tool or Snip & Sketch
If you used the Snipping Tool or Snip & Sketch, you get to choose where to save the screenshot, so the location is wherever you chose to save it.
Print Screen (PrtScn)
- PrtScn: This takes a screenshot of the entire screen and copies it to your clipboard. You’ll need to paste it into a program like Paint or Microsoft Word to save it.
- Alt + PrtScn: This takes a screenshot of the active window and copies it to your clipboard. Again, you’ll need to paste it into a program to save it.
- Windows key + Shift + S: This opens the Snip & Sketch tool, allowing you to select a region of the screen to capture. The screenshot is copied to the clipboard and you’ll need to paste it into a program to save it.
Windows key + Print Screen
If you press the Windows key + Print Screen, the screenshot will be saved as a file. You can find it in the Screenshots folder inside the Pictures library. The path is usually:
C:\Users\[Your Username]\Pictures\Screenshots
Game Bar
If you’re using the Game Bar to take screenshots in a game, the default save location is:
C:\Users\[Your Username]\Videos\Captures
Third-Party Software
If you’re using third-party software like Snagit or Lightshot, the save location will depend on the software settings.
To navigate to these folders, you can open File Explorer (Windows key + E) and then enter the path in the address bar, or navigate through the folders.
Conclusion
Screenshots are more than just a quick way to capture information; they’re a tool for effective digital communication. Whether you’re using Windows 10, Windows 11, or even a Chromebook, mastering the art of screenshotting will make your digital life infinitely easier. So go ahead, and start screenshotting like a pro.