
Known for its speed, security, and intuitive interface, Google Chrome is among the most widely used web browsers in the world today. However, one issue that many Chrome users face is the high number of processes that it runs in the background, even when you have only one tab open. These processes can lead to high CPU and memory usage, causing your computer to slow down or become unresponsive. In this article, we’ll look at some of the reasons why Chrome creates multiple processes and how you can stop them from running.
Why Does Chrome Open So Many Processes?
Chrome’s multiple-process architecture is designed to make the browser more stable and secure. Each tab, extension, and plugin runs in its own process, which means that if one tab or plugin crashes, it won’t bring down the entire browser. Additionally, each process runs with its own set of permissions, making it more difficult for malicious code to access sensitive information or take over your system.
However, having too many processes running at the same time can also cause performance issues. Each process consumes some amount of memory and CPU resources, which can add up quickly if you have many tabs open or extensions installed. If you’re experiencing slow performance or other issues with Chrome, it may be worth checking how many processes it’s running and taking steps to reduce their number.
How to Stop Multiple Chrome Processes From Running in Task Manager (Windows 10/11)?
Here are 6 methods that you can use to stop multiple Chrome processes from running, depending on the cause of the problem.
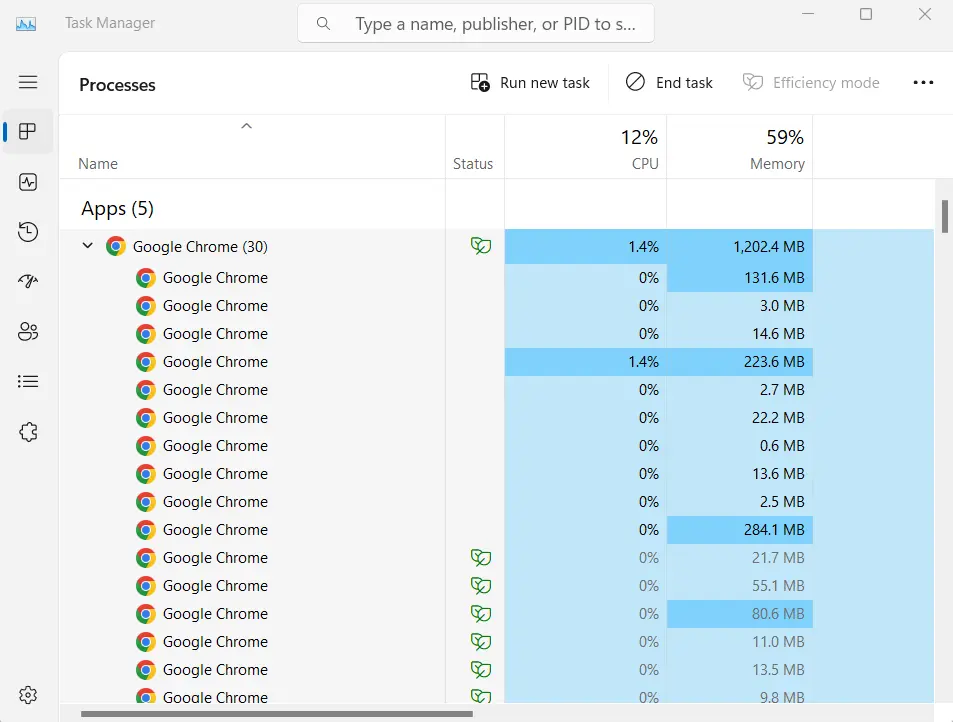
1. End tasks manually via Chrome Task Manager
Chrome has a built-in Task Manager that shows you all the processes it’s running, along with their memory and CPU usage. Below are 2 simple ways to open Chrome Task Manager and kill unwanted processes:
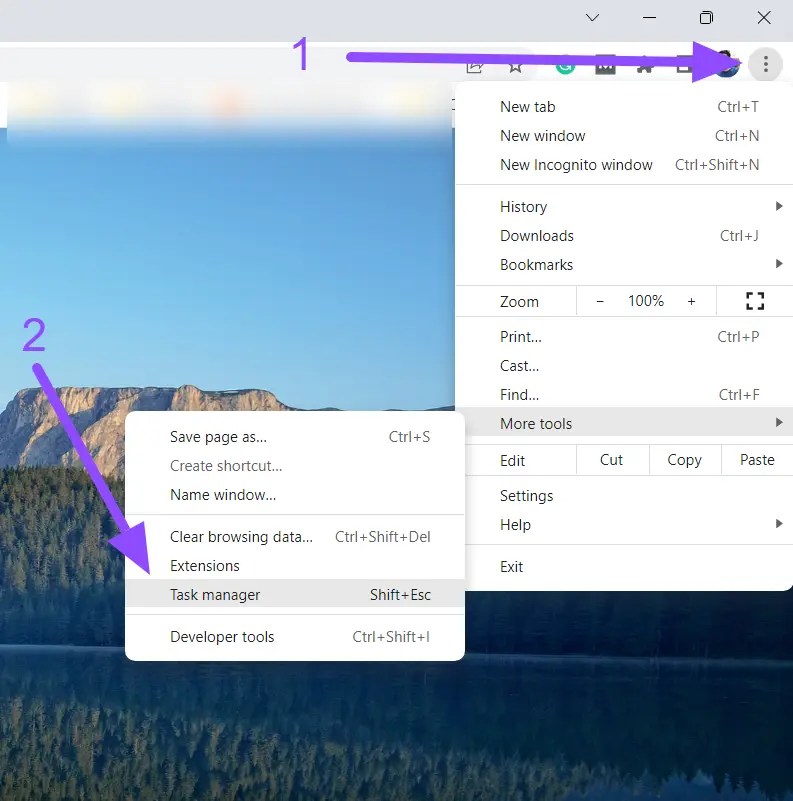
- To open it, click on the three dots menu, select More tools, then Task Manager. From there, you can identify which processes are consuming the most resources and close them if necessary.
- Or, press Shift+Esc on your keyboard to open Chrome Task Manager and see the multiple running processes. Select the processes that you want to end, and then click on the “End Process” button
See Also: How to Resolve “WiFi Doesn’t Have a Valid IP Configuration” Issue on Your PC
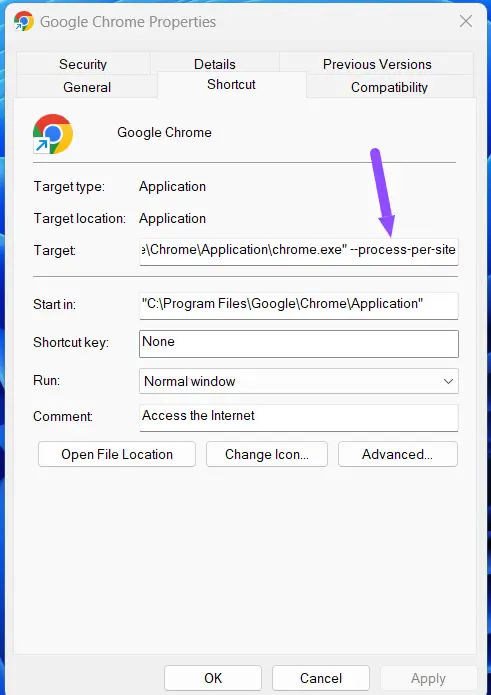
2. Change the Chrome.exe target
By default, Chrome is configured to use multiple processes for each tab, utility, and extension. However, it is possible to disable this feature by modifying the configuration settings, which can only be done with admin access.
To do this, follow these steps:
- Right-click on the Chrome shortcut on your desktop.
- Select “Properties”.
- In the “Target” field, copy and add “–process-per-site” at the end.
- Example: Add 1 space before this code and it should appear like this “C:\Program Files\Google\Chrome\Application\chrome.exe” –process-per-site
- Click on “Apply” and then “OK”.
There are also a number of Chrome extensions that can help you to stop multiple Chrome processes from
running. One popular extension is called “The Great Suspender”. It has been downloaded by over 100,000 users and has received an overall 4-star rating based on 85 reviews on the Chrome Web Store.
To use “The Great Suspender”, follow these steps:
- Install The Great Suspender extension from the Chrome Web Store
- Once installed, it will automatically start working.
- To suspend a tab, hover over the tab and click on the “The Great Suspender” icon.
- To unsuspend a tab, click on the “The Great Suspender” icon again.
3. Disable unnecessary extensions and plugins

As mentioned earlier, extensions and plugins can contribute to the number of processes Chrome runs. If you have many extensions or plugins installed, some of which you don’t use frequently, consider disabling or removing them to reduce the number of processes.
To do this, click on the three dots menu in the top-right corner of Chrome, select More tools, then Extensions. From there, you can disable or remove any extensions or plugins you don’t need.
Also Read: Gboard Not Working? 8 Ways to Fix “Gboard Keeps Stopping” Error
4. Clear your browsing data
Over time, Chrome can accumulate a lot of browsing data, such as cookies, cache, and history. This data
can also contribute to performance issues. If you wish to clear your browsing data, you can follow these steps:
- Open Chrome.
- Click on the three dots in the top right corner of the window.
- Select “More Tools” > “Clear browsing data“.
- In the “Clear browsing data” window, select “All time” from the “Time range” option and the data that you want to clear, and then click on the “Clear data” button.
5. Close unused tabs
Each tab in Chrome runs in its own process, so having many tabs open at once can increase the number of processes. If you have many tabs open but aren’t using them all, consider closing the ones you don’t need. This can free up memory and CPU resources, improving performance.
6. Reset Chrome settings
If none of the above solutions work, you can try resetting Chrome to its default settings. This will remove all your browsing data, including history, cookies, and passwords, but it may also fix any issues that are causing excessive process usage.
To do this, click on the three dots menu, select Settings, then scroll down and click on the “Reset settings” to their original defaults. Confirm your choice and wait for Chrome to reset.

7. Upgrade your PC hardware and software
If you’ve tried all of the above solutions and are still experiencing performance issues with Chrome, it may be time to consider upgrading your hardware. Adding more RAM or upgrading your processor can help your computer handle more processes and improve overall performance.
If you’re still experiencing performance issues with Chrome, you may want to try updating your graphics
driver.
To do this, follow these steps:
- Go to the website of your graphics card manufacturer.
- Download the latest driver for your graphics card.
- Install the driver.
8. Use a different web browser
If you’ve tried all of the above methods and you’re still experiencing performance issues with Chrome, you may want to consider using a different web browser. There are a number of other popular web browsers available, such as Firefox, Edge, and Opera.
You May Like: Solutions to Fix Android and iPhone Screen Keeps Going Black
Conclusion
In conclusion, having multiple Chrome processes running simultaneously can cause your computer’s performance to suffer. This article has explored the reasons behind multiple Chrome processes and provided eight effective methods to stop them. By implementing these methods, you can improve your browsing experience and optimize your device’s resources.
Whether you prefer to use Chrome’s built-in settings or install an external extension, there are various solutions available to address this issue. By following the steps outlined in this article, you can enjoy faster browsing speeds and a more responsive computer.
Hi there! I’m Nick Cullen. As the Senior Content Editor with Solution Suggest, my responsibility is to scrutinize and refine our articles and reviews, focusing on software solutions, games, apps, and websites. I’m dedicated to delivering reliable and enlightening content that offers viable alternatives to your current digital tools. If you have any suggestions or inquiries, you can reach me at editor@solutionsuggest.com. Also, I invite you to connect with me on LinkedIn!